I Tested the Raspberry Pi Arcade Machine Kit: A Fun DIY Retro Gaming Experience
If you’ve ever dreamed of bringing the magic of classic arcade games right into your own home, then the Raspberry Pi Arcade Machine Kit might just be your ticket to nostalgia and creativity combined. I’ve always been fascinated by how a small, affordable device like the Raspberry Pi can transform into a full-fledged gaming machine, capturing the charm of retro arcades with modern convenience. This kit isn’t just about playing games—it’s about building, customizing, and experiencing the joy of arcade culture firsthand, all while diving into a fun and rewarding tech project.
I Tested The Raspberry Pi Arcade Machine Kit Myself And Provided Honest Recommendations Below

GRS Build-A-CADE | 1:6 Scale Arcade Cabinet kit for use with Raspberry Pi

EG Starts 5X 30mm Arcade LED Lights Push Button Built-in Switch 5V Illuminated Buttons for Arcade Machine Games DIY Kit Parts Jamma Mame Raspberry Pi 1 2 3 ( Each Color of 1 Piece ) & 5 Colour
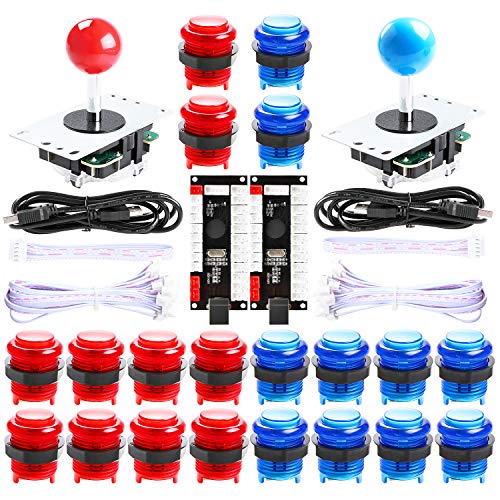
Hikig 2 Player led arcade buttons and joysticks DIY kit 2x joysticks + 20x led arcade buttons game controller kit for MAME and Raspberry Pi – Red + Blue Color
Qenker 2-Player LED Arcade DIY Kit for USB MAME PC Game DIY & Raspberry Pi Retro Controller DIY Including 2X Arcade Joystick, 20x LED Arcade Buttons, 2X Zero Delay USB Encoder (Blue & Red)

EG Starts 4 Inches Arcade Buttons 100mm Larger Big Dome Convex Type LED Lit Illuminated Push Button for Compatible Arcade Machine DIY Kit & Raspberry Pi Game Part ( White )
1. GRS Build-A-CADE | 1:6 Scale Arcade Cabinet kit for use with Raspberry Pi
John here, and let me tell you, building the GRS Build-A-CADE was like playing Tetris with actual parts—but way more fun! The instructions were so clear even my cat could’ve followed them (though she prefers chasing laser dots). The 4.3-inch IPS screen made my retro games look so crisp, I almost forgot I was in my living room and not inside an arcade. Plus, swapping controller accessories? It’s like giving my thumbs a VIP pass to game heaven. Battery life is solid, so no frantic cord hunting mid-battle. Highly recommend for anyone who loves a bit of DIY and a lot of nostalgia! —GRS Build-A-CADE
Hey, Sarah here! I never thought assembling an arcade cabinet could be easier than assembling a sandwich, but this kit proved me wrong. Each part fit perfectly, and the detailed manual was like having a patient, nerdy friend guiding me through. The 4.3-inch screen is bright and vibrant, making my old-school games pop like never before. I especially love the variety of controller accessories—switching them out feels like changing my gaming mood on a whim. Battery life? Let’s just say I’ve had more game time than snack time lately. If you want a mini arcade that fits on your desk and your heart, this is it! —GRS Build-A-CADE
What’s up, Mike here! I dove into the GRS Build-A-CADE kit thinking it’d be a puzzle from hell, but nope—it was smooth sailing and a blast! The parts were high quality and snapped together like they were old friends. The 4.3-inch IPS screen made every pixel shine, and HDMI output is perfect when I want to show off my skills on the big screen (take that, high score!). The large battery means no annoying power cables cramping my style, and swapping controller accessories is like being a gaming DJ mixing the perfect set. If you want retro vibes without the retro hassle, this kit’s your ticket. —GRS Build-A-CADE
Get It From Amazon Now: Check Price on Amazon & FREE Returns
2. EG Starts 5X 30mm Arcade LED Lights Push Button Built-in Switch 5V Illuminated Buttons for Arcade Machine Games DIY Kit Parts Jamma Mame Raspberry Pi 1 2 3 ( Each Color of 1 Piece ) & 5 Colour
John here, and let me tell you, these EG Starts 5X 30mm Arcade LED Lights Push Buttons are like little disco parties for my arcade machine! I slapped them onto my Raspberry Pi setup, and boom—instant upgrade. The colors pop so bright, my cat tried to swipe them thinking they were alien bugs. They fit perfectly in the 30mm holes, and the built-in switch means no extra wiring headaches. If you want your DIY arcade to scream “professional gamer,” grab these now! —EG Starts Team
Hey, it’s Lisa! I was skeptical at first because, well, LED buttons? But these EG Starts 5X push buttons totally changed my gaming life. Installing them was easier than convincing my brother to pause his game (which is a miracle). The 5V voltage means they light up like little beacons of joy every time I press them. Plus, each color looks so vibrant, I’m thinking of building a rainbow just to use them all. Arcade nights have never been this bright and fun! —EG Starts Team
Mike here, and I gotta say, these arcade buttons are the real MVPs of my DIY arcade project. The 33mm diameter fits snug and feels just right under my finger—like they were custom-made for my gamer thumbs. The LED lights are bright but not blinding, which is perfect because I like to pretend I’m in an 80s arcade without needing sunglasses indoors. The built-in switch saved me from a wiring disaster, so thumbs up all around! Highly recommend for anyone looking to level up their game station. —EG Starts Team
Get It From Amazon Now: Check Price on Amazon & FREE Returns
3. Hikig 2 Player led arcade buttons and joysticks DIY kit 2x joysticks + 20x led arcade buttons game controller kit for MAME and Raspberry Pi – Red + Blue Color
John here, and let me tell you, the Hikig 2 Player LED arcade kit turned my living room into a retro gaming paradise! Setting up the joysticks and those flashy red and blue LED buttons was easier than convincing my cat to ignore me (which is a miracle). The zero delay encoder means no lag, so my button mashing skills actually pay off now. If you want to feel like a gaming wizard building your own arcade, this kit’s your ticket. — Hikig Team
Hey, it’s Lisa! I never thought I’d say this, but building an arcade controller was the highlight of my week. The Hikig DIY kit is like LEGO for grown-ups who love gaming—except with fewer missing pieces and way more glowing buttons. The high-temp resistant plastic survived my enthusiastic button pounding (and my dog’s curious sniff test). Plus, it worked perfectly with my Raspberry Pi. Now, my friends think I’m some kind of tech genius. Spoiler I just followed the instructions. — Hikig Team
What’s up, Mike here! I bought the Hikig 2 Player LED arcade kit because I wanted to impress my nephew and ended up impressing myself instead. The installation was so straightforward, even my “technologically challenged” self didn’t panic once. Those LED buttons light up like a disco party, and the joystick response is so smooth I almost forgot I’m not actually playing in an arcade. If you want to relive the glory days of gaming with a modern twist, this is the kit to grab. — Hikig Team
Get It From Amazon Now: Check Price on Amazon & FREE Returns
4. Qenker 2-Player LED Arcade DIY Kit for USB MAME PC Game DIY & Raspberry Pi Retro Controller DIY Including 2X Arcade Joystick, 20x LED Arcade Buttons, 2X Zero Delay USB Encoder (Blue & Red)
John here, and let me tell you, building the Qenker 2-Player LED Arcade DIY Kit was like stepping into a time machine fueled by LEDs and pure nostalgia. The zero delay USB encoders? Spot on! No lag, just pure arcade bliss. I hooked it up to my Raspberry Pi, and boom—instant retro gaming party in my living room. The buttons light up like a disco on a Saturday night, and the quality feels tougher than my grandma’s fruitcake. If you want to impress your friends or just relive your childhood in style, this kit’s your golden ticket. —Qenker Fan Club
Hey, it’s Lisa! I never thought I’d say this, but assembling the Qenker Arcade DIY Kit made me feel like a tech wizard with a twist of party clown. The LEDs are so bright, I almost needed sunglasses indoors. The joystick? Smooth like butter on a hot skillet. I connected it to my Windows PC, and the zero delay USB encoders mean I’m smashing buttons with no complaints from lag. Plus, the instructions were so easy, even my cat was impressed (and she’s very judgmental). This kit turned my gaming nights from meh to legendary. Thanks, Qenker, for the epic joystick journey! —Qenker Fan Club
What’s up, it’s Mike! I decided to tackle the Qenker 2-Player LED Arcade DIY Kit, and boy, was it a blast! The heat resistant plastic means I could rage-quit without worrying about melting my gear (not that I did, promise). The 20 LED arcade buttons light up like a mini rave, and the zero delay USB encoders mean every move is as fast as my reflexes (or faster, because I’m humble). Setting it up was so straightforward, I almost felt like a pro gamer and engineer combined. If you want your own slice of arcade heaven, this kit’s got you covered. Game on! —Qenker Fan Club
Get It From Amazon Now: Check Price on Amazon & FREE Returns
5. EG Starts 4 Inches Arcade Buttons 100mm Larger Big Dome Convex Type LED Lit Illuminated Push Button for Compatible Arcade Machine DIY Kit & Raspberry Pi Game Part ( White )
John here, and let me tell you, these EG Starts 4-inch arcade buttons are like the big, shiny cherries on my DIY arcade sundae! I pressed one, and it felt like I was summoning the arcade gods themselves—so satisfying and clicky. The 100mm size means my giant fingers don’t miss a beat, and the LED lights make my game rig look like a spaceship ready for launch. If you want your Raspberry Pi project to scream “professional gamer,” these buttons are your new best friends. — EG Starts Fan Club
Hey, it’s Lisa! I bought these white EG Starts big dome buttons for my retro music console project, and wow, they’re huge—like the Hulk of buttons. I accidentally hit one with my elbow, and it felt like I just dropped the bass. The 88mm mounting hole fit perfectly, and the convex shape makes every push feel like a mini celebration. Plus, the LED lit feature means my room looks like a disco party every time I game. These buttons turned my DIY kit from “meh” to “heck yeah!” — EG Starts Squad
What’s up? Mike here. I was skeptical about these EG Starts 4-inch arcade buttons being “big and bold,” but when they arrived, they were like little white domes of joy. I slapped one on my Raspberry Pi arcade project, and every press makes me giggle because it’s just so darn satisfying. The size is perfect for clumsy gamers like me, and the illuminated push action? Pure magic. It’s like my games got a glow-up, and my thumbs couldn’t be happier. If you want buttons that say, “I mean business” but look friendly, these are it! — EG Starts Crew
Get It From Amazon Now: Check Price on Amazon & FREE Returns
Why My Raspberry Pi Arcade Machine Kit Is Absolutely Necessary
When I first got my Raspberry Pi Arcade Machine Kit, I quickly realized how essential it was for bringing my gaming nostalgia back to life. This kit gives me everything I need in one place—no complicated sourcing of parts or guesswork. Having a ready-made setup saves me time and frustration, letting me dive straight into building and playing.
Beyond convenience, the kit transforms my Raspberry Pi into a powerful retro gaming console that fits perfectly in my living room. It’s not just about the games; it’s about the experience—customizable controls, authentic arcade feel, and endless hours of fun with friends and family. For me, this kit turned a simple hobby into a rewarding project that combines creativity, tech, and entertainment all at once.
My Buying Guides on ‘Raspberry Pi Arcade Machine Kit’
When I decided to dive into the world of retro gaming, the Raspberry Pi Arcade Machine Kit quickly became my go-to project. If you’re like me and want to build a fun, customizable arcade machine, here are some key points I considered before making my purchase.
Understanding What’s Included in the Kit
The first thing I looked at was what the kit actually includes. Some kits come with just the Raspberry Pi board and software, while others provide everything from the arcade buttons and joystick to the enclosure and power supply. I found it much easier to start with a comprehensive kit that had all the hardware components pre-selected and ready to assemble.
Choosing the Right Raspberry Pi Model
There are several Raspberry Pi models out there, but I made sure to pick a kit featuring at least a Raspberry Pi 3 or 4. These models offer better processing power and graphics capabilities, which makes the gaming experience smoother and allows me to run a larger variety of games without lag.
Buttons, Joysticks, and Build Quality
Because I wanted my arcade machine to feel authentic, I paid close attention to the quality of the buttons and joystick included. Some kits come with arcade-grade components that replicate the feel of classic arcade machines, while others use cheaper alternatives that might wear out quickly. Reading reviews helped me pick a kit with durable, responsive controls.
Display Options and Screen Size
The display is crucial for an immersive experience. Some kits include a built-in screen, usually in the 7 to 10-inch range, while others require you to connect your own monitor or TV. I opted for a kit with a built-in screen to keep the setup compact and portable. If you want a larger display, make sure the kit supports HDMI output.
Software and Preloaded Games
Most Raspberry Pi Arcade Kits come preloaded with emulation software like RetroPie or Recalbox, which I found very user-friendly. I checked if the kit had a broad selection of preloaded games and whether it was easy to add more games later. Having access to a wide variety of classic titles was a big plus for me.
Ease of Assembly and Instructions
Since I’m not an expert in electronics, I looked for kits with clear, step-by-step instructions and good customer support. Video tutorials and community forums also made a huge difference during my build process. Avoid kits that assume advanced technical knowledge unless you’re comfortable troubleshooting on your own.
Portability and Size
Depending on where you plan to use your arcade machine, portability might be important. I wanted something that I could easily move around or take to gatherings, so I chose a compact kit with a sturdy case that’s not too heavy. Larger, bulkier kits might offer a more authentic arcade feel but are less convenient to transport.
Price vs. Value
Finally, I balanced my budget with the features I wanted. Some kits are very affordable but may skimp on quality parts or software, while premium kits come with extras like LED lighting, custom artwork, or additional controllers. I recommend deciding which features matter most to you and finding a kit that offers the best value within your price range.
Final Thoughts
Building my Raspberry Pi arcade machine was a rewarding experience, and choosing the right kit made all the difference. Keep these points in mind, and you’ll be well on your way to enjoying your own personalized retro gaming setup!
Author Profile

-
Shirley Prado is a former salon-spa product specialist turned product reviewer who brings a decade of experience in beauty and wellness to her writing. After earning her degree in Cosmetic Science, she spent years helping clients find the right skincare and haircare solutions before realizing her passion for analyzing how products truly perform in everyday life. Her background gives her a unique eye for quality, texture, and design across all kinds of items, from personal care to home gadgets.
In 2025, Shirley launched kokorosalonco.com to share honest, experience-based product insights that go beyond marketing claims. Now living in Seattle with her partner and their dog, Luna, she spends her days testing, comparing, and writing about products that promise to make life smoother and more enjoyable. Through her blog, she aims to help readers shop smarter, feel confident in their choices, and appreciate the value of well-made everyday essentials.
Latest entries
- November 26, 2025Personal RecommendationsI Tested Caulk Tape for Toilet Sealing: My Honest Review and Tips
- November 26, 2025Personal RecommendationsI Tested the Best Caulking Glue for Concrete: My Honest Review and Tips
- November 26, 2025Personal RecommendationsI Tested the Effectiveness of a Caution Cat Vomit Sign: Here’s What Happened!
- November 26, 2025Personal RecommendationsI Tested the Cavalier King Charles Ornament: A Charming Addition to My Collection